Saturday, 25 January 2025

Best Wood Types for Crafting a Durable Bar Table

- 0 comments

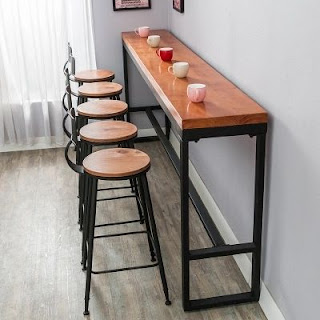
Best Wood Types for a Rock-Solid Bar Table

Crafting a bar table isn't just about aesthetics; it's about building a sturdy centerpiece that can withstand years of lively gatherings. The right wood makes all the difference. Choosing wisely ensures your creation not only looks stunning but also endures countless drinks, spirited conversations, and the occasional accidental spill. This guide explores the best wood types to guarantee your bar table stands the test of time, becoming a cherished part of your home.

Hardwoods: The Heavy Hitters

Hardwoods reign supreme for bar tables due to their inherent strength and durability. These woods boast a higher density, making them resistant to dents, scratches, and everyday wear and tear. However, their density also makes them more challenging to work with, often requiring more specialized tools and experience. The higher upfront cost is easily justified by their longevity and impressive appearance.

Oak: A Classic Choice

Oak, a timeless classic, offers exceptional strength and durability. Its tight grain and resistance to moisture make it ideal for high-traffic areas. You'll find a variety of oak species, each with unique characteristics: red oak boasts a warm reddish-brown hue, while white oak presents a more subtle, creamy tone. Both offer excellent workability and a beautiful grain pattern that adds character to any bar table.

Maple: Sleek and Strong

Maple provides a stunning, clean aesthetic, prized for its fine, even grain and light coloration. Its density ensures exceptional durability, resisting dents and scratches remarkably well. Hard maple is especially favored for its strength and hardness, perfect for enduring the rigors of a busy bar. The natural beauty of maple pairs well with a variety of design styles, from sleek modern to rustic farmhouse.

Walnut: Rich and Luxurious

Walnut is a showstopper, known for its rich, dark brown tones and striking grain patterns. Its strength and durability rival other hardwoods, while its luxurious appearance elevates any space. While potentially more expensive, the beauty and longevity of walnut make it a worthwhile investment for a truly exceptional bar table. The dark color also hides scratches effectively, maintaining its elegance over time.

Softwoods: Budget-Friendly Options with Character

While not as durable as hardwoods, certain softwoods can provide a cost-effective alternative for building a bar table, especially with appropriate finishing and care. They offer distinct aesthetic qualities and are often easier to work with for DIY enthusiasts. However, be mindful that these woods are more susceptible to dents and scratches, requiring careful handling and potentially more frequent maintenance.

Pine: A Versatile Choice

Pine is a readily available and affordable softwood. Its warm, slightly yellowish tone and visible grain add a rustic charm. While softer than hardwoods, proper finishing, such as multiple coats of polyurethane, can significantly enhance its durability. Pine’s forgiving nature makes it a good choice for beginners.

Factors Beyond Wood Type

Remember, the longevity of your bar table isn't solely dependent on the wood. Other factors contribute significantly to its durability:

  • Finishing: Apply several coats of a high-quality sealant to protect against spills and scratches.
  • Construction: Use robust joinery techniques (like mortise and tenon joints) for maximum stability.
  • Maintenance: Regularly clean and condition the wood to preserve its beauty and extend its lifespan.

Ultimately, the best wood for your bar table depends on your budget, aesthetic preferences, and desired level of durability. Carefully consider your needs and the characteristics of each wood type to create a lasting centerpiece for your home.

[Continue reading...]

How to Make a Wooden Wall Clock with Custom Features for Home Décor

- 0 comments

Crafting a Bespoke Wooden Wall Clock: A Comprehensive Guide

The creation of a custom wooden wall clock offers a rewarding blend of artistry and craftsmanship. This detailed guide provides a comprehensive walkthrough, from initial design conception to final finishing, enabling you to construct a unique timepiece that perfectly complements your home décor. The process, while demanding precision and patience, results in a deeply personalized and aesthetically pleasing addition to any living space.

I. Design and Planning: The Foundation of Your Clock

The success of any project hinges on meticulous planning. Before commencing the construction phase, careful consideration must be given to several key aspects of your clock's design.

A. Determining the Clock's Style and Dimensions

The first step involves defining the overall aesthetic. Will your clock be minimalist and modern, rustic and charming, or perhaps ornate and intricate? Consider the existing style of your home and choose a design that complements it seamlessly. Sketch several options, experimenting with different shapes, sizes, and embellishments. Decide on the overall dimensions of the clock face, ensuring it's proportionate to the wall space where it will be displayed. Accurate measurements are crucial for accurate cutting and assembly.

B. Selecting the Wood Species

The choice of wood significantly impacts the clock's visual appeal, durability, and workability. Hardwoods like oak, maple, walnut, and cherry offer superior strength and longevity, though they can be more challenging to work with. Softwoods such as pine and cedar are easier to manipulate, but may require additional care to prevent scratches or dents. Consider the natural grain, color, and texture of the wood, selecting a species that aligns with your design vision. The availability and cost of the wood should also be factored into the decision-making process.

C. Mechanism Selection and Integration

The clock mechanism is the functional heart of your creation. Choose a high-quality movement that ensures accurate timekeeping. Consider the style and size of the movement, ensuring it's compatible with the dimensions of your clock's design. Many readily available mechanisms offer various features, such as silent operation, different hand styles, and varying levels of precision. Plan the placement of the movement within the clock case carefully, allowing ample space for installation and access for future maintenance.

D. Creating Detailed Drawings and Templates

Before cutting any wood, create precise drawings and templates. These will serve as guides throughout the construction process, ensuring accurate dimensions and consistent component placement. Software programs like CAD can be invaluable for creating detailed plans, especially for intricate designs. Alternatively, hand-drawn sketches with accurate measurements can also be effective. Regardless of the method, meticulous attention to detail is paramount.

II. Construction: Bringing Your Design to Life

With the design finalized and plans prepared, the construction phase commences. This stage requires precision and the appropriate tools. Safety precautions, such as wearing safety glasses and dust masks, should be strictly adhered to throughout the process.

A. Cutting and Shaping the Wood

Using appropriate tools, such as a table saw, jigsaw, or bandsaw, carefully cut the wood according to your templates. Accuracy is key to ensuring a well-fitted clock case. Sanding is crucial to achieve smooth surfaces and prepare the wood for finishing. Begin with coarser grit sandpaper and progressively move to finer grits, paying attention to removing any imperfections or splinters.

B. Assembling the Clock Case

The method of assembling the clock case will depend on the design. Techniques such as joinery (mortise and tenon, dovetail, etc.) can be employed for a strong and aesthetically pleasing join. Alternatively, simpler methods such as gluing and clamping can be used for less complex designs. Ensure all joints are properly aligned and secured to create a rigid and stable structure. Clamps are essential for maintaining the alignment during the gluing process.

C. Integrating the Clock Mechanism

Once the clock case is assembled and finished, carefully install the clock mechanism. This typically involves attaching the movement to the back of the clock face. Follow the manufacturer's instructions carefully, ensuring the hands are correctly positioned and the movement is properly secured. Test the functionality of the mechanism before proceeding to the final stages of construction.

D. Creating the Clock Face

The design of the clock face can be as simple or complex as desired. A plain wooden face can be left unfinished or stained/painted to match the clock case. Alternatively, you can create a more elaborate design using inlay techniques, wood burning, or painting. Numerals can be applied using various methods, from simply painting numbers onto the face to applying pre-made metal or wooden numerals. Ensure the numerals are evenly spaced and clearly legible.

III. Finishing and Detailing: Adding the Finishing Touches

The final stages involve refining the clock's appearance and protecting the wood.

A. Sanding and Refinement

Prior to applying any finish, meticulously sand all surfaces to remove any remaining imperfections. Pay particular attention to the edges and corners, ensuring a smooth, even finish. Use progressively finer grits of sandpaper to achieve a flawless surface.

B. Applying a Protective Finish

Applying a protective finish enhances the wood's beauty and provides durability. Options include varnish, polyurethane, shellac, or wax. Choose a finish that complements the wood's natural grain and desired aesthetic. Apply the finish in thin, even coats, allowing each coat to dry completely before applying the next. Multiple thin coats are generally preferred over a single thick coat, preventing runs and drips.

C. Adding Custom Features

This is where your creativity truly shines. Consider adding personalized elements that reflect your unique style. These could include:

  • Engraving: Add a personalized message, date, or monogram.
  • Inlays: Incorporate contrasting wood species or other materials.
  • Decorative Hardware: Use unique hands, screws, or other hardware.
  • Painting or Staining: Create a unique color scheme or pattern.

D. Hanging and Display

Finally, securely hang your handcrafted clock on the chosen wall. Ensure the hanging mechanism is securely attached and can support the weight of the clock. Consider the placement carefully, ensuring it's visible and complements the surrounding décor. Stand back and admire your unique, handcrafted wooden wall clock, a testament to your craftsmanship and creativity.

Crafting a custom wooden wall clock is a journey of discovery and skill development. By following this guide meticulously and embracing your personal style, you will create a treasured heirloom that will grace your home for years to come.

[Continue reading...]

How to Craft Wooden Wall Hooks for Home Organization

- 0 comments

Craft Your Own Wooden Wall Hooks: A DIY Home Organization Project

So, you're looking to add some rustic charm and practical storage to your home? Forget those mass-produced plastic hooks! Let's dive into the wonderfully satisfying world of crafting your own wooden wall hooks. This isn't some complicated woodworking marathon; it's a fun, achievable project perfect for a weekend afternoon (or a slightly longer, more leisurely crafting session!). I'll walk you through it step-by-step, and trust me, the sense of accomplishment â€" and the stylish new hooks â€" will be totally worth it.

Choosing Your Wood and Tools: Getting Started

First things first: let's gather our supplies. The beauty of this project is the flexibility. You can get really creative with the type of wood you use!

The Wood: Your Creative Canvas

Here are a few ideas to get you started:

  • Scrap wood: Got some leftover pieces from another project? Perfect! This is a fantastic way to recycle and save money. Just make sure the pieces are thick enough to hold what you plan to hang.
  • Reclaimed wood: Give old pallets or fence posts new life! Reclaimed wood adds a unique character and a touch of eco-friendliness to your hooks.
  • New wood: Home improvement stores offer various types of wood in different sizes and thicknesses. Consider hardwoods like oak or maple for durability, or softer woods like pine for easier carving (if you're feeling ambitious!).

Remember to choose wood that’s relatively straight and free of large knots or cracks, especially if you're a beginner. A piece roughly 1-2 inches thick and at least 4-6 inches long will work great for most hooks.

The Essential Tool Kit:

You won't need a massive workshop to tackle this. Here's what you'll need:

  • Measuring tape and pencil: For precise marking.
  • Saw: A hand saw, jigsaw, or even a coping saw will do the trick. Choose the saw you’re most comfortable using.
  • Drill: With a drill bit slightly smaller than the diameter of your screws.
  • Screwdriver (or drill with screwdriver bit): To secure the hooks to the wall.
  • Sandpaper: Various grits for smoothing the edges and surfaces. Start with a coarser grit and finish with a finer grit for a smooth, polished look.
  • Wood glue (optional): If you're creating more complex designs.
  • Wood stain or paint (optional): To add color and protection.
  • Safety glasses and dust mask: Always prioritize safety!

Designing and Cutting Your Hooks: The Fun Part!

Now for the creative part! You can go as simple or as elaborate as you like.

Simple Hook Designs:

The easiest approach is to cut simple rectangular or square shapes.

  • Measure and mark: Decide on the dimensions of your hook (length, width, and thickness). Mark these on your wood.
  • Cut to size: Carefully saw along your marked lines. Take your time; accuracy makes a big difference!
  • Sand it smooth: Use sandpaper to smooth all the edges and surfaces. Pay special attention to any sharp corners.

To make a simple hook shape, you can even just cut a single piece of wood into an "L" shape.

More Advanced Designs:

Feeling adventurous? Consider these options:

  • Curved hooks: Use a jigsaw to create a more elegant, curved shape. You can freehand it or draw a template first.
  • Multiple hooks from one piece: Cut a longer piece of wood and create several hooks side-by-side.
  • Intricate shapes: If you’re confident with your woodworking skills, you can use templates or freehand designs to create more complex shapes.

Finishing Touches: Adding Personality and Protection

Once your hooks are cut and sanded to perfection, it's time to add the finishing touches.

Applying Stain or Paint:

A coat of stain or paint enhances both the look and durability of your hooks.

  • Choose your finish: Wood stain brings out the natural grain of the wood, while paint allows for a wider range of colors and styles.
  • Apply evenly: Follow the manufacturer's instructions for your chosen product. Use a brush, rag, or spray gun, depending on your preference.
  • Let it dry: Allow ample drying time before handling or installing your hooks.

Installing Your Hooks:

Finally, it's time to hang your beautiful creations!

  • Pre-drill holes: Drill pilot holes on the back of each hook before screwing them into the wall. This prevents the wood from splitting.
  • Secure to the wall: Use appropriate screws for your wall type (drywall anchors for drywall, etc.).
  • Hang and admire: Step back and admire your handiwork! You’ve successfully created unique, personalized wooden wall hooks.

Commonly Asked Questions

Q: What kind of screws should I use?

A: The best screw type depends on your wall material. For drywall, use drywall anchors. For wood studs, use wood screws. Choose screws that are appropriate for the thickness of your wood and the weight of the items you'll be hanging.

Q: Can I use a different type of saw?

A: Yes, many different saws can be used. A hand saw is a good option for beginners, while a jigsaw allows for more intricate cuts. A coping saw is great for smaller, detailed work.

Q: How do I prevent the wood from splitting when screwing it into the wall?

A: Always pre-drill pilot holes slightly smaller than the diameter of your screws. This will help to prevent the wood from splitting.

Q: What if I don't have any woodworking experience?

A: Don’t worry! This project is beginner-friendly. Start with a simple design and take your time. There are plenty of online tutorials and videos that can guide you through each step.

Q: What can I hang on these hooks?

A: The weight capacity of your hooks will depend on the type of wood, the size of the hook, and the type of screws used. You can typically hang coats, bags, hats, keys, or other lightweight items. For heavier items, consider using thicker wood and stronger screws.

There you have it! Your very own handmade wooden wall hooks. Enjoy the process, be creative, and most importantly, have fun! And remember, even if your first attempt isn't perfect, the experience and the resulting organization will be well worth the effort. Happy crafting!

[Continue reading...]

How to Craft Wooden Coasters with Unique Inlays and Designs

- 0 comments

Crafting Exquisite Wooden Coasters with Unique Inlays and Designs

Unleash your inner artisan and create stunning, personalized wooden coasters! This comprehensive guide walks you through the process of designing and crafting coasters with unique inlays, transforming simple wood into functional works of art. Forget mass-produced monotony; we’ll show you how to create coasters that reflect your personal style and add a touch of handmade charm to your home or become perfect, thoughtful gifts.

Choosing Your Materials: The Foundation of Your Design

The journey begins with selecting the right materials. Consider the overall aesthetic you envision. Hardwoods like maple, cherry, or walnut provide durability and a rich grain, while softer woods like basswood offer easier carving. For the inlay, explore options like contrasting hardwoods, colorful resin, or even metallic accents. Think about the colors and textures that will complement each other and create visual interest. Don't forget the finishing touches â€" choose a durable, food-safe finish to protect your creation and enhance its beauty. A clear polyurethane varnish is a popular and reliable option.

Gathering Your Tools: Essential Equipment for Coaster Creation

Before you start, assemble your essential tools. This list isn't exhaustive, but it covers the basics:

  • Woodworking saw (hand saw or jigsaw)
  • Chisels (various sizes)
  • Mallet or hammer
  • Sandpaper (various grits)
  • Clamps
  • Wood glue
  • Measuring tape and ruler
  • Pencil
  • Safety glasses
  • Finishing supplies (e.g., polyurethane varnish, brushes)
For inlay work, you may also need specialized tools depending on the inlay material. For resin inlays, a suitable mold will be crucial.

Designing Your Coaster: From Concept to Creation

Now for the fun part: design! Sketch out your coaster shape and inlay pattern. Consider geometric patterns, floral motifs, or abstract designs. Remember to account for the size and thickness of your chosen wood. Keep it simple for your first attempt, gradually increasing complexity as you gain experience. You can freehand your design directly onto the wood or use stencils for more precise results. Precise measurements are key to ensure a clean and professional finish.

Cutting and Shaping Your Coaster Base: Precision is Paramount

Using your chosen saw, carefully cut your chosen wood to the desired dimensions for your coaster base. Pay close attention to your measurements to create uniform coasters. Smooth the edges and refine the shape using sandpaper. For intricate shapes, a jigsaw offers greater precision. Remember to always wear safety glasses to protect your eyes from flying wood chips.

Creating and Installing the Inlay: Adding a Touch of Artistry

Depending on your chosen inlay material, the installation process will vary. For hardwood inlays, accurately cut pieces to fit your pre-planned design, creating a precise recess in the coaster base to accommodate them. Use wood glue to secure the inlay pieces firmly in place. For resin inlays, carefully prepare your mold within the recess, ensuring the resin is properly mixed and poured to avoid air bubbles. Allow ample curing time according to the resin manufacturer's instructions. Once the inlay is securely in place, gently sand any excess material level with the coaster surface.

Finishing Touches: Protecting Your Masterpiece

Once the inlay is firmly set, it's time to apply the finishing touches. Sand the entire coaster surface smooth, paying attention to transitions between the base wood and the inlay. Apply several thin coats of your chosen food-safe finish, allowing each coat to dry completely before applying the next. This process protects your coaster from spills and everyday wear and tear, enhancing its longevity and beauty. Let the final coat cure completely before using your coasters.

Congratulations! You’ve successfully crafted unique and stunning wooden coasters. Now you can enjoy your handmade creation, adding a personal touch to your home, or sharing the joy of handcrafted gifts with loved ones. Remember, practice makes perfect, so keep experimenting with different designs, materials, and techniques to create even more personalized and exquisite coasters.

[Continue reading...]

Friday, 24 January 2025

How to Build a Portable Wooden Bar Table with Wheels

- 0 comments

Building Your Dream Portable Wooden Bar Table with Wheels

Hey there, fellow DIY enthusiasts! So you want to build a portable wooden bar table with wheels, huh? Fantastic! That’s a project that’ll impress your friends, make your next party a breeze, and generally just feel incredibly satisfying to complete. Let's dive into this fun project together, step by step. I’ll walk you through it in a way that even someone who’s never picked up a saw before can follow. Don't worry, we’ll tackle this at a comfortable pace.

Planning & Materials: Getting Started Right

Before we even think about sawing wood, we need a plan. This isn't brain surgery, but a little preparation goes a long way. Measure your space, consider how many people you typically entertain, and envision the overall style you’re going for. Rustic? Modern? Sleek? This will inform your material choices.

Choosing Your Wood

For a bar table, you want something sturdy and durable. Pine is a classic and affordable option, readily available at most home improvement stores. Hardwoods like oak or maple will be more expensive but offer superior durability and a richer look. Consider the weight â€" a heavier wood will be more stable but harder to move around (defeating the purpose of the wheels!).

Gathering Your Supplies

Okay, grab your shopping list! You’ll need:

  • Wood (check your plan for the exact dimensions and type)
  • Wood glue
  • Wood screws (various sizes)
  • Clamps (essential for gluing!)
  • Sandpaper (various grits)
  • Wood stain or paint (optional, but highly recommended!)
  • Polyurethane sealant (to protect your beautiful work!)
  • Four heavy-duty caster wheels (with brakes are a good idea!)
  • Measuring tape
  • Saw (circular saw or miter saw recommended, but a hand saw will work in a pinch)
  • Drill with drill bits
  • Screwdriver (or drill with a screwdriver bit)
  • Safety Glasses
  • Dust mask

Remember, safety first! Always wear safety glasses and a dust mask when working with power tools and wood dust.

Building the Table Top

Let’s start with the star of the show â€" the table top! This is where you'll be placing those delicious cocktails.

Cutting the Wood

Based on your design, cut your chosen wood pieces to the correct dimensions for your tabletop. If you’re going for a simple rectangular top, this is straightforward. For a more complex shape, a detailed plan is crucial! Carefully measure twice, cut once â€" trust me, you’ll thank yourself later.

Assembling the Table Top

Once your pieces are cut, apply wood glue to the edges that will be joined. Use clamps to hold everything together firmly while the glue dries. This is where your clamps become your best friends. Allow plenty of time for the glue to set (check the manufacturer's instructions). Once dry, use wood screws to reinforce the joints for extra strength and durability. You want this tabletop to last!

Sanding and Finishing

After the glue has dried and the screws are in place, it’s time for sanding. Start with a coarser grit sandpaper to remove any rough edges and imperfections, then gradually move to finer grits for a smooth, polished surface. Now for the fun part â€" stain or paint! Follow the manufacturer’s instructions for your chosen finish. Once dry, apply a few coats of polyurethane sealant to protect the wood from spills and wear and tear.

Building the Base and Attaching the Wheels

Now comes the sturdy foundation that will support your beautiful tabletop.

Constructing the Base

The base design is up to you! A simple box frame is easy to build and very stable. You could also get fancy with a more intricate design, depending on your skills and ambition. Cut your wood to size according to your chosen design and assemble using wood glue and screws. Remember to clamp everything securely while the glue dries.

Attaching the Caster Wheels

Once the base is sturdy and dry, it's time to add those wheels! This is where you'll appreciate the heavy-duty caster wheels. Measure and mark where you want to attach the wheels to the base. You’ll probably need to pre-drill pilot holes to prevent the wood from splitting. Then, secure the wheels using appropriate screws. Make sure they're securely attached â€" you don't want the wheels falling off during a party!

Attaching the Tabletop to the Base

Finally, we're putting it all together! Carefully position the finished tabletop onto the base. You may need to add some support pieces underneath for extra stability, depending on the size and weight of your tabletop. Use screws to attach the tabletop to the base. Ensure the screws are countersunk and hidden, for a clean finish.

Finishing Touches and Enjoy!

Almost there! Give your bar table one last thorough sanding, paying attention to any areas that might need extra smoothing. Add a final coat of polyurethane to seal everything beautifully. Now, stand back and admire your handiwork. Isn’t it amazing?

Commonly Asked Questions

Q: Can I use different types of wood for the tabletop and base?

A: Absolutely! You could use a more expensive hardwood for the tabletop and a less expensive wood for the base to save money.

Q: How much does this project cost?

A: The cost depends heavily on your wood choices and the size of the table. Expect to spend anywhere from $50 to $200 or more, depending on your materials.

Q: What if I don't have a lot of woodworking experience?

A: This is a great beginner project! Just take it slow, follow the instructions carefully, and don't be afraid to ask for help if you get stuck.

Q: Can I stain the wood after it's assembled?

A: It's best to stain the wood *before* assembly for a more even finish, but you can stain it after, just be careful not to get stain on the wheels!

Q: How much weight can this table hold?

A: That depends on the type of wood and the construction of your base. A well-built table should easily hold a significant amount of weight, but don't overload it!

There you have it! Your very own portable wooden bar table with wheels. Go ahead, invite your friends over for a celebratory drink â€" you’ve earned it!

[Continue reading...]

Best Types of Wood for Crafting Cutting Boards: Choosing the Right Materials

- 0 comments

Best Types of Wood for Crafting Cutting Boards: Choosing the Right Materials

The selection of wood for crafting a cutting board is a crucial decision impacting both the board's longevity and its suitability for food preparation. While aesthetics play a role, the primary considerations should be centered on the wood's hardness, density, durability, resistance to moisture and bacterial growth, and its overall suitability for repeated knife contact. This article delves into the properties of various wood species, offering a comprehensive guide for discerning woodworkers seeking to create high-quality, safe, and long-lasting cutting boards.

Hardwoods: The Preferred Choice for Cutting Boards

Hardwoods, generally denser and more resistant to wear than softwoods, are the preferred material for crafting cutting boards. Their inherent durability ensures the board can withstand the rigors of daily use without significant damage or degradation. Several hardwoods stand out as particularly well-suited for this purpose.

Hard Maple (Acer saccharum)

Hard maple consistently ranks among the top choices for cutting board construction. Its exceptional hardness, close grain, and resistance to wear make it an ideal material. Hard maple exhibits a pleasing light color, often with subtle figuring, and readily accepts finishes. Its non-porous nature minimizes the absorption of liquids and bacteria, enhancing its hygienic properties. However, its relatively high cost may be a limiting factor for some.

Walnut (Juglans spp.)

Walnut, known for its rich, dark color and attractive grain pattern, offers a beautiful and durable option for cutting boards. While not as hard as hard maple, its density and resistance to wear are still significant. Walnut's self-healing properties â€" the ability of small cuts to close naturally â€" add to its longevity. However, walnut's oil content can lead to darkening over time, potentially affecting its overall appearance.

Cherry (Prunus serotina)

Cherry boasts a warm, reddish-brown hue that deepens with age, creating a visually appealing cutting board. Its moderate hardness and relatively close grain make it suitable for most kitchen tasks. Cherry is more readily available and often less expensive than maple or walnut, making it a more accessible option. Its relative softness compared to maple means it might require more careful maintenance and may show knife marks more readily.

Beech (Fagus spp.)

Beech, a strong and durable hardwood, is a cost-effective alternative to more expensive options like maple or walnut. Its fine, even grain provides a smooth cutting surface. While not as resistant to water as maple, proper oiling and care will significantly extend its lifespan. Its light color offers a clean aesthetic and it can readily accept stains or finishes for customization.

End-Grain Cutting Boards: A Unique Approach

While the aforementioned hardwoods are suitable for edge-grain cutting boards (where the knife cuts across the grain), end-grain cutting boards offer superior performance. In these boards, the wood grain is perpendicular to the cutting surface. This design reduces knife dulling, protecting blades while improving the board's overall lifespan and reducing the risk of bacterial accumulation. Hardwoods like maple, cherry, and walnut are excellent choices for end-grain cutting boards due to their ability to withstand significant wear.

Softwoods: Considerations and Limitations

Softwoods, generally softer and less dense than hardwoods, are less suitable for crafting cutting boards intended for frequent and rigorous use. Their softer texture makes them more susceptible to knife marks, scoring, and overall degradation. While some softwoods might be used for less demanding applications, their porosity increases the risk of moisture absorption and bacterial growth.

Pine (Pinus spp.)

Pine, a readily available and relatively inexpensive softwood, is generally not recommended for cutting boards. Its soft texture makes it prone to knife damage, and its porous nature leads to excessive moisture absorption and bacterial growth, potentially posing food safety concerns. While it can be used for less demanding tasks, using pine for a cutting board lacks the durability and hygiene necessary for a well-functioning kitchen tool.

Factors Beyond Wood Species

Beyond the choice of wood, other factors significantly influence a cutting board's performance and longevity:

Construction Techniques

The method of construction plays a critical role. Proper joinery, such as mortise and tenon or dowel joints, is essential for ensuring the board's structural integrity and preventing warping or cracking over time. Glues used in construction should be food-safe. The overall construction should be robust and resist water penetration.

Finishing and Maintenance

Proper finishing is crucial for protecting the wood and enhancing its longevity and hygiene. Food-safe mineral oil, frequently applied, provides a protective barrier against moisture and helps prevent the wood from drying out and cracking. Avoid using harsh chemicals or finishes that could leach into food.

Hygiene

Regular cleaning is paramount to maintain hygiene. After each use, clean the cutting board thoroughly with soap and warm water. Avoid placing cutting boards in the dishwasher, as the high heat and harsh detergents can damage the wood. Allow the board to air dry completely before storing it in a well-ventilated area.

Conclusion

Crafting a high-quality cutting board requires careful consideration of the wood species, construction techniques, and ongoing maintenance. Hardwoods such as hard maple, walnut, cherry, and beech offer superior durability, hygiene, and aesthetic appeal compared to softwoods. End-grain construction further enhances performance. By understanding these factors, woodworkers can create durable, beautiful, and safe cutting boards that will serve their purpose effectively for many years.

Choosing the right wood is only the first step. Proper construction, finishing, and diligent maintenance are essential elements in ensuring the longevity and safety of your handmade cutting board.

[Continue reading...]

Wall-Mounted Wooden Picture Frames with Easy Hanging Options

- 0 comments

Wall-Mounted Wooden Picture Frames: Effortless Hanging & Stunning Displays

Hey there! So you're looking for some beautiful, wall-mounted wooden picture frames, but you're not thrilled with the idea of wrestling with complicated hanging systems? You've come to the right place! I'm going to walk you through everything you need to know about finding the perfect frames and getting them up on your walls without any fuss. Let's dive in!

Why Choose Wooden Picture Frames?

Okay, let's be honest, there's a million picture frames out there. But there's something undeniably classic and charming about a good wooden frame. They add warmth and texture to any room, and they just look more substantial than their cheaper plastic or metal counterparts. Plus, the right wooden frame can elevate even a simple print or photograph to a piece of art.

Variety of Woods and Finishes

The world of wood is vast! You've got light and airy options like pine or birch, adding a touch of rustic charm. Then there's the rich, deep tones of walnut or mahogany, perfect for creating a more formal or sophisticated look. And don't forget about the finishes! From sleek, modern stains to distressed, antique looks, you'll find a wooden frame to complement any style, whether your home is minimalist, bohemian, farmhouse chic, or somewhere in between.

Durability and Longevity

Let's talk practicality. Wooden frames are built to last. Unlike their less sturdy cousins, they're less prone to chipping or breaking, and with proper care, they can stay beautiful for years, even decades. Think about it: you're not just buying a frame; you're investing in a piece that will hold your precious memories for a long time to come.

Easy Hanging Options: No More Hammer-Headaches!

Now, this is the part everyone cares about: getting those frames on the wall without any hassle. Thankfully, there are tons of easy hanging solutions available nowadays. No more struggling with picture wire and tiny nails!

Sawtooth Hangers: The Classic Choice

Sawtooth hangers are the workhorse of picture hanging. They're simple, reliable, and readily available. Most wooden frames come with them pre-installed, making the hanging process a breeze. Just find a stud in your wall (or use a sturdy wall anchor), and you're good to go!

D-Rings and Wire: A Versatile Option

D-rings offer a bit more flexibility. They allow you to adjust the height of the wire, giving you more control over the placement of the frame on the wall. Just make sure the wire is securely attached and the D-rings are sturdy enough for the weight of your frame.

Easy-Hang Systems: The No-Fuss Solution

For the ultimate in convenience, consider frames with built-in easy-hang systems. These often involve adhesive strips or clips that make hanging and removing the frame a quick and simple process. They’re great for renters or anyone who wants to easily rearrange their wall decor!

Choosing the Right Hanging Hardware

The weight of your frame will determine what type of hanging hardware you need. Lighter frames might be fine with just adhesive strips, while heavier frames will require stronger solutions like nails or screws. Always check the weight recommendations of your chosen hardware before committing.

Finding the Perfect Frame for Your Photos and Artwork

With so many choices out there, finding the *perfect* frame can feel overwhelming. But don't worry! Here are a few things to keep in mind:

Consider Your Style

Does your home have a modern, rustic, minimalist, or eclectic vibe? The style of your frame should complement your existing decor. A sleek, black frame might look amazing in a modern space, while a rustic, whitewashed frame could be perfect for a farmhouse-style home.

Think About the Matting

Matting can really enhance your artwork or photograph. It adds a layer of visual interest and helps to create a more polished look. Consider the color and width of the matting to complement your image and frame.

Frame Size and Proportion

The size of your frame should be proportionate to the size of your artwork. A tiny frame around a large print can look unbalanced, just as a massive frame around a small photo might look overwhelming. Aim for a harmonious balance between the two.

Caring for Your Wooden Picture Frames

To keep your wooden picture frames looking their best, a little care goes a long way:

  • Dust regularly: Use a soft cloth or duster to gently wipe away dust and debris.
  • Avoid harsh chemicals: Never use harsh cleaners or abrasive materials, as they can damage the finish of your frame.
  • Protect from moisture: Keep your frames away from direct sunlight and moisture, as this can cause warping or discoloration.
  • Handle with care: Avoid dropping or bumping your frames, as this could cause damage.

Beyond the Basics: Exploring Different Frame Styles

Wooden frames come in a plethora of styles. Beyond simple rectangular frames, you can find:

  • Ornate frames: These feature intricate carvings and details, perfect for adding a touch of elegance.
  • Gallery frames: Wide and deep, these frames are ideal for displaying larger artworks or collections.
  • Shadow box frames: These frames have a recessed area, allowing for three-dimensional displays.

Commonly Asked Questions

Here are some questions I frequently get about wall-mounted wooden picture frames:

Q: How do I find a stud in my wall?

A: You can use a stud finder, which is a handy little tool you can pick up at most hardware stores. Alternatively, you can tap gently along the wallâ€"you'll usually hear a more solid sound when you hit a stud.

Q: What if I don't want to nail into my walls?

A: There are plenty of damage-free hanging solutions like adhesive strips or command strips, particularly for lighter frames. Just make sure to check the weight limits before using them.

Q: How do I clean a wooden frame?

A: Use a soft, dry cloth to dust regularly. For more stubborn dirt, you can gently dampen the cloth (avoid soaking it!) with a mild solution of water and a little dish soap, then dry thoroughly.

Q: Where can I buy high-quality wooden picture frames?

A: You can find beautiful wooden frames at art supply stores, home decor shops, online retailers, and even antique shops for unique finds!

I hope this comprehensive guide has helped you on your journey to finding and hanging the perfect wall-mounted wooden picture frames! Happy decorating!

[Continue reading...]

Simple Ottoman Table Plans for First-Time Builders

- 0 comments

Conquer Your DIY Dreams: Simple Ottoman Table Plans for Beginners

So, you're itching to build something with your own two hands, huh? That's awesome! And an ottoman? That's a fantastic first project. They're relatively straightforward, incredibly versatile, and the satisfaction of plopping your feet up on something *you* made? Priceless. This guide will walk you through building a simple ottoman table, even if you've never picked up a saw before. We'll keep it super beginner-friendly, with plenty of tips and tricks along the way. Get ready to unleash your inner craftsman (or craftswoman!)

Choosing Your Materials: The Foundation of Your Ottoman

Before we even think about hammering nails, let's talk materials. The beauty of ottoman building is that you have tons of options, allowing you to personalize your project based on your style and budget.

The Wood: Your Ottoman's Backbone

For a first-timer, I'd highly recommend using readily available, easy-to-work-with wood like pine or fir. These are relatively inexpensive, forgiving if you make a little mistake (we all do!), and readily available at most home improvement stores. Think of it like training wheels for your woodworking journey. You can always graduate to hardwoods like oak or maple later on. Aim for wood that's at least ¾ inch thick for a sturdy ottoman. Avoid anything too knotty, as those can make things more challenging.

The Upholstery: The Soft Touch

This is where you get to have some fun! Choose a fabric that reflects your style. Something durable like canvas or a sturdy cotton is a good choice for a first project. Avoid anything too delicate or prone to snagging. You’ll also need batting or foam for padding. A thin layer of batting will give a nice, soft finish, and foam will add extra cushioning. You can even find pre-made foam cushion inserts at craft stores to make it super easy.

The Tools: Your Arsenal of Creation

Don't worry, you don't need a full-blown woodworking shop. For this project, you'll mainly need:

  • Measuring tape
  • Saw (a hand saw or circular saw will work)
  • Drill with drill bits
  • Screwdriver (or drill with screwdriver bits)
  • Wood glue
  • Sandpaper (various grits)
  • Staple gun (for attaching the fabric)
  • Safety glasses (super important!)

That's it! You might also want clamps to hold things together while the glue dries, but they're not strictly necessary for a simple ottoman.

Building the Box: The Structural Heart

Okay, let's get our hands dirty! The basic structure of an ottoman is a simple box. For this example, let's aim for a 16" x 16" x 16" ottoman. You can adjust these dimensions to your liking, of course!

Cutting the Wood

First, cut your wood to size. You'll need four pieces for the sides (16" x 16"), and one piece for the bottom (16" x 16"). Remember to measure twice and cut once! Accuracy is key here. If you're using a hand saw, take your time and make clean, straight cuts. A circular saw is quicker, but make sure you have a stable work surface.

Assembling the Box

Use wood glue and screws to assemble your box. Apply a generous bead of glue to the edges of the wood, then clamp the pieces together. Once the glue is applied, pre-drill pilot holes (slightly smaller than your screws) to prevent the wood from splitting. Then, screw the pieces together. Make sure the corners are square and everything is nice and snug.

Adding the Finishing Touches: Aesthetics and Comfort

Once your box is assembled and the glue has dried, it's time to make it pretty and comfortable!

Sanding for Smoothness

Sand all the edges and surfaces of your ottoman to smooth out any rough spots. Start with a coarser grit sandpaper and gradually move to a finer grit for a super smooth finish. This will make the ottoman more comfortable and look more polished.

Upholstery Magic

Measure your ottoman box and cut your fabric and foam/batting to size, adding a few extra inches for wrapping around the sides. Attach the foam or batting to the top of the ottoman box. Then, stretch your fabric over the top, pulling it taut to create a smooth, wrinkle-free surface. Staple the fabric to the bottom of the ottoman box, working your way around all four sides. You can use a staple remover if you misplace a staple.

Finishing Up and Admiring Your Creation

Congratulations! You've just built your very own ottoman. Take a moment to admire your handiwork â€" you’ve accomplished something great! You can add some finishing touches, like adding decorative trim to the fabric or painting the wooden box if you choose.

Commonly Asked Questions

Q: What if my box isn't perfectly square?

A: Don't panic! Minor imperfections are normal, especially for beginners. You can use wood filler to fill any gaps and sand it smooth. The fabric will hide most minor flaws.

Q: Can I use different types of wood?

A: Absolutely! Hardwoods will create a more durable and sophisticated ottoman, but they can be more challenging to work with for beginners.

Q: How do I clean my ottoman?

A: It depends on the fabric. Always spot-clean first. For most fabrics, you can vacuum it or gently wipe with a damp cloth.

Q: Can I make it a different size?

A: Yes! Adjust the dimensions to fit your space and needs.

Q: What if I don't have a staple gun?

A: You can use strong adhesive to attach the fabric, but a staple gun makes it much easier and more secure.

And there you have it! Your very own DIY ottoman. Remember, building is a learning process. Don't be afraid to make mistakes â€" they're part of the journey. Most importantly, have fun and enjoy the satisfaction of creating something beautiful with your own hands!

[Continue reading...]

How to Make a Cutting Board Set to Sell: Matching Designs for Retail or Online Sale

- 0 comments

Crafting a Killer Cutting Board Set: Your Guide to Retail & Online Success

So, you're thinking of making and selling cutting board sets? Fantastic! It's a rewarding craft, and with a little planning and the right approach, you can build a thriving business. This guide will walk you through everything from designing your sets to marketing them effectively, whether you're aiming for a bustling farmer's market stall or a booming online shop.

Designing Your Dream Cutting Board Set

Before you even pick up a saw, you need a plan. What kind of aesthetic are you going for? Rustic charm? Modern minimalism? Whimsical florals? Your design will dictate your target audience and pricing strategy, so take your time with this.

Choosing Your Wood

The type of wood you use significantly impacts the look, feel, and price of your cutting boards. Popular choices include:

  • Maple: Hard, durable, light-colored, and takes stains well.
  • Walnut: Rich, dark color, very hard, and expensive.
  • Cherry: Warm reddish-brown tones, durable, and relatively affordable.
  • Bamboo: Sustainable, renewable, and relatively inexpensive, but can be less durable than hardwoods.
  • Hardwoods that show contrast: Consider using woods that have a distinct difference in color and grain when constructing the boards, for an eye-catching result.

Don't be afraid to experiment! Combining different wood types can create stunning visual effects. Just make sure you're using food-safe wood glues and finishes.

Crafting a Cohesive Set

The key to a successful cutting board set is the matching design. This doesn't necessarily mean identical boards. Think about variations that complement each other. For example:

  • Size Variation: Create a set with a large chopping board, a medium-sized serving board, and a small cheese board.
  • Shape Variation: One rectangular board, one square, and one circular board, all in a similar wood and finish.
  • Design Variation: Maybe one board has a simple edge profile while another is embellished with a routed design. Or maybe you use a contrasting wood inlay in one board while leaving the others simple.

Consider creating a theme. A "Mediterranean" set might use olive wood and incorporate simple geometric inlays. A "Rustic Farmhouse" set could feature rough-hewn edges and a distressed finish. This thematic approach creates a strong brand identity.

Finishing Touches

The finish is crucial. It protects the wood, enhances its beauty, and makes your boards easy to clean. Popular options include:

  • Mineral oil: Food-safe, enhances the wood's natural color, and needs regular reapplication.
  • Cutting board oil: Specifically designed for cutting boards, often containing beeswax or other protective ingredients.
  • Food-safe polyurethane: Provides a more durable, water-resistant finish, but some people prefer the natural feel of mineral oil.

Production and Packaging

Once you've perfected your designs, it's time to think about production and packaging. This is where efficiency and presentation meet.

Streamlining Your Workflow

If you're making multiple sets, optimize your workflow. Pre-cut your wood to standard sizes, create jigs for consistent cuts, and establish a clear production sequence to save time and reduce errors.

Packaging for Protection and Presentation

Packaging is crucial for both protecting your boards during shipping and presenting them attractively to customers. Consider:

  • Individual board wraps: Protect each board from scratches.
  • A sturdy box: Keeps the whole set secure during shipping.
  • Branding: Include your logo and business details on the packaging.
  • Gift-worthy presentation: Consider adding tissue paper or a ribbon for a premium feel.

Pricing and Marketing Your Cutting Board Sets

Pricing your cutting boards correctly is vital for profitability. Consider your material costs, labor time, and desired profit margin.

Competitive Research

Research what similar cutting board sets are selling for on Etsy, Amazon, or in local shops. This will give you a good benchmark for your pricing.

Marketing Your Creations

Online marketplaces like Etsy and Amazon are great starting points. High-quality product photos are essential. Showcase your craftsmanship with close-ups of the wood grain and the finished product.

Social media marketing is also vital. Platforms like Instagram and Pinterest are perfect for visually showcasing your beautiful cutting board sets. Use relevant hashtags, engage with followers, and run contests or giveaways to increase visibility.

Consider participating in craft fairs and farmers' markets. This offers a direct connection with potential customers and allows you to build relationships.

Frequently Asked Questions

Here are some commonly asked questions about creating and selling cutting board sets:

What kind of glue should I use?

Use a food-safe wood glue specifically designed for woodworking. Titebond is a popular choice.

How do I make sure my boards are food-safe?

Always use food-safe wood, glue, and finish. Avoid using harsh chemicals or finishes that could leach into food.

How do I care for my cutting boards?

Hand-wash your cutting boards with warm soapy water. Avoid submerging them in water for extended periods. Regularly oil them with mineral oil or cutting board oil to keep them looking their best.

How much should I charge for my cutting board sets?

The price depends on the materials, labor, and your desired profit margin. Research your competition and factor in all your costs.

Where can I sell my cutting board sets?

Online marketplaces like Etsy and Amazon are excellent starting points. You can also sell at craft fairs, farmers' markets, or through your own website.

Starting a cutting board business takes dedication and planning, but the rewards are plentiful. With a well-designed product, efficient production, and effective marketing, you can build a successful and fulfilling enterprise.

[Continue reading...]

Thursday, 16 January 2025

Wooden Box DIY Ideas for Home Storage Bins

- 0 comments

Elevating Home Organization: A Comprehensive Guide to Wooden Box DIY Storage Solutions

The allure of handcrafted storage solutions is undeniable. Wooden boxes, crafted with care and personalized to individual needs, offer a unique blend of functionality and aesthetic appeal. This guide delves into the diverse possibilities of creating customized wooden storage boxes for your home, encompassing various design considerations, construction techniques, and finishing options to ensure a seamless integration with your existing décor.

Choosing Your Wood and Design

The foundation of any successful DIY project lies in the selection of appropriate materials. When choosing wood for your storage boxes, several factors warrant careful consideration. The type of wood dictates not only the aesthetic but also the durability and longevity of your creation. Hardwoods such as oak, walnut, and cherry offer exceptional strength and a rich, refined look, ideal for projects requiring significant weight-bearing capacity or a premium aesthetic finish. Softer woods like pine or cedar provide a more affordable option, exhibiting a lighter color and a more rustic charm; however, they are less durable and may require more care during construction and finishing.

Considering Wood Grain and Color

The natural grain patterns of wood offer unique textural elements. The choice between a prominent grain, like that found in oak, and a more subtle grain, characteristic of pine, depends on the overall aesthetic vision. Similarly, the inherent color of the woodâ€"ranging from the warm tones of cherry to the pale hues of birchâ€"can significantly influence the final appearance. Consider how the wood color will complement the existing décor of the room where the boxes will be placed.

Design Considerations: Size, Shape, and Functionality

Before embarking on construction, meticulously plan the dimensions, shape, and functionality of your wooden storage boxes. Consider the intended purpose: will they store blankets, books, toys, or smaller items like jewelry? The size and shape should directly reflect this purpose. Small, square boxes are ideal for organizing jewelry or toiletries, while larger, rectangular boxes are better suited for blankets or clothing. Unusual shapes, like hexagonal or octagonal boxes, can add a touch of artistic flair to the space, adding a unique design element.

Construction Techniques: From Simple to Sophisticated

The construction techniques employed will depend on the complexity of the desired design and the builder's skill level. Simple designs can be constructed using basic joinery techniques, while more intricate designs may necessitate advanced woodworking skills and tools.

Basic Box Construction: Butt Joints and Glue

For beginners, the simplest approach involves using butt joints secured with wood glue and possibly reinforced with screws or nails. This method is straightforward and requires minimal tooling. However, it's crucial to ensure the joints are precisely aligned to create a sturdy, visually appealing box. Clamping the assembled box until the glue is fully cured is essential to maintain the integrity of the joints.

Advanced Joinery Techniques: Dovetail, Mortise and Tenon

More experienced woodworkers may opt for advanced joinery techniques like dovetail or mortise and tenon joints. These techniques create incredibly strong and visually stunning joints, enhancing the overall quality and durability of the box. Dovetail joints, known for their interlocking nature, are aesthetically pleasing and extremely strong, ideal for high-end projects. Mortise and tenon joints, while requiring more precision, offer superior strength and a clean, refined appearance.

Adding Functional Elements: Hinges, Latches, and Handles

Adding hinges, latches, or handles elevates the functionality and aesthetics of the wooden boxes. High-quality hinges ensure smooth opening and closing, while sturdy latches secure the contents. The choice of handlesâ€"from simple knobs to ornate pullsâ€"can greatly influence the overall design aesthetic. Consider the overall style of the room and choose hardware that complements the wood and finish.

Finishing Touches: Enhancing Aesthetics and Durability

The final stage involves finishing the wooden boxes to enhance both their aesthetic appeal and durability. This process involves sanding, staining, painting, or sealing the wood.

Sanding for a Smooth Finish

Proper sanding is crucial to achieve a smooth surface free of imperfections. Start with coarser grit sandpaper (e.g., 80-grit) to remove any rough edges or blemishes, then gradually progress to finer grits (e.g., 120-grit, 220-grit) to achieve a flawless finish. Ensure even sanding across all surfaces to avoid uneven textures.

Staining and Painting Options

Staining enhances the natural beauty of the wood by penetrating the surface and bringing out the grain's color and texture. A wide variety of stains are available, ranging from light washes to deep, rich colors. Alternatively, painting provides a completely different aesthetic, allowing for a diverse range of colors and finishes. Consider using a primer before painting for improved adhesion and color vibrancy.

Sealing for Protection and Durability

Sealing the finished box with a clear coat of varnish, polyurethane, or lacquer protects it from moisture, scratches, and everyday wear and tear. This step is essential to preserve the box's beauty and extend its lifespan. Choose a sealant appropriate for the type of wood and intended use. Several coats are often necessary for optimal protection.

Creative Variations and Design Ideas

The beauty of DIY projects lies in their endless possibilities for customization and personalization. Here are a few creative variations to inspire your wooden box projects:

  • Incorporate decorative elements: Add inlaid designs, decorative carvings, or stencils for a more artistic and personalized touch.
  • Experiment with different finishes: Try using metallic paints, distressed finishes, or decoupage techniques to create unique visual effects.
  • Create matching sets: Craft a set of boxes of varying sizes for a cohesive and coordinated storage solution.
  • Use reclaimed wood: Give old pallets or reclaimed wood a new life by repurposing them into unique and eco-friendly storage boxes.
  • Add fabric lining: Line the interior of the boxes with fabric for an added layer of protection and visual appeal.
  • Build a lidded box with hinges: Securely close items inside with well-placed hinges.
  • Create a multi-compartment box: Divide the interior using dividers to organize smaller items effectively.
  • Construct decorative box fronts: Include decorative moldings or carvings for an elevated appearance.

By carefully considering the wood type, design, construction techniques, and finishing options, you can create stunning and functional wooden storage boxes that elevate your home organization and showcase your creativity. Remember that meticulous planning and attention to detail are key to ensuring a successful and rewarding DIY project.

[Continue reading...]

Eco-Friendly DIY Wooden Bread Box Ideas for Sustainable Living

- 0 comments

Eco-Friendly DIY Wooden Bread Box Ideas for Sustainable Living

The pursuit of sustainable living necessitates mindful choices in every aspect of our lives, extending to even seemingly insignificant household items. The humble bread box, often overlooked, presents a prime opportunity to embrace eco-conscious practices. Discarding plastic bread containers in favor of a handcrafted wooden alternative not only reduces plastic waste but also introduces a touch of rustic charm to the kitchen. This article explores various DIY wooden bread box designs, emphasizing the use of reclaimed or sustainably sourced wood to minimize environmental impact.

Sourcing Sustainable Materials: The Foundation of Eco-Conscious Craft

The core principle of creating an environmentally responsible bread box lies in the responsible sourcing of materials. Opting for reclaimed wood offers significant environmental advantages. Reclaimed wood, salvaged from demolished structures, old furniture, or discarded pallets, reduces the demand for newly harvested timber, thereby mitigating deforestation and carbon emissions associated with logging and transportation. Furthermore, reclaimed wood often possesses a unique character, displaying the patina of time and adding a distinctive aesthetic to the finished product.

Identifying Suitable Reclaimed Wood Sources

Locating suitable reclaimed wood often involves some research and networking. Consider the following avenues:

  • Demolition sites: Contact construction companies undertaking demolition projects. They may be willing to donate or sell salvaged wood.
  • Salvage yards: Salvage yards specialize in recovering and reselling reusable materials, including various types of wood.
  • Online marketplaces: Websites and online classifieds frequently feature listings for reclaimed wood.
  • Friends and family: Ask your network if they have any old wooden furniture or pallets they are willing to part with.

Once you've acquired the reclaimed wood, ensure it is properly cleaned and treated to eliminate any potential contaminants or pests before commencing the construction process. Thorough sanding is crucial to achieve a smooth surface for a safe and aesthetically pleasing bread box.

Sustainable Wood Alternatives: Considering New Wood

If reclaimed wood is unavailable, consider sourcing sustainably harvested wood from certified suppliers. Look for certifications like the Forest Stewardship Council (FSC) label, which indicates that the wood comes from forests managed responsibly for ecological, social, and economic sustainability. Choosing locally sourced wood further minimizes the environmental footprint by reducing transportation distances and associated emissions.

Designing Your Eco-Friendly Bread Box: Various Construction Methods

The design possibilities for a DIY wooden bread box are virtually limitless, ranging from simple, rustic designs to more intricate, ornate creations. The choice of design depends largely on the skill level of the crafter and the available tools.

The Simple Crate Design: A Beginner-Friendly Approach

This design is ideal for beginners and requires minimal woodworking skills. It involves assembling a simple box-like structure from reclaimed wood planks or boards, securing the pieces with wood glue and screws. A simple hinged lid can be created using hinges and a latch. This design emphasizes functionality and simplicity, showcasing the natural beauty of the reclaimed wood.

The More Advanced Box-Joint Design: Enhancing Strength and Aesthetics

For those with more woodworking experience, a box-joint construction offers superior strength and a more refined aesthetic. Box joints involve creating interlocking joints between the box sides, eliminating the need for visible screws or nails. This requires precise cuts and careful assembly but results in a sturdy and visually appealing bread box.

Incorporating Reclaimed Hardware: Completing the Sustainable Design

Completing the eco-conscious approach requires consideration of the hardware used. Opt for reclaimed or salvaged hinges, latches, and handles whenever possible. These items can be sourced from antique shops, flea markets, or even disassembled old furniture. If new hardware is necessary, choose materials with low environmental impact, such as stainless steel or recycled metal.

Finishing Touches: Protecting and Enhancing Your Bread Box

The final step involves applying a protective finish to your wooden bread box. This not only enhances the wood's appearance but also protects it from moisture and prevents warping. However, it’s crucial to choose eco-friendly finishes to maintain the sustainability of the project.

Natural Oil Finishes: Emphasizing Natural Beauty

Natural oils, such as linseed oil, tung oil, or mineral oil, provide a protective barrier while allowing the natural grain and color of the wood to shine through. These oils are biodegradable and generally non-toxic, making them a suitable choice for eco-conscious crafters. Multiple thin coats are recommended for optimal protection.

Beeswax Finishes: A Non-Toxic and Food-Safe Option

Beeswax finishes offer a food-safe and non-toxic option, ideal for bread boxes. They provide a water-resistant layer while leaving a slightly glossy finish that enhances the texture of the wood. Beeswax finishes are easily applied and can be refreshed periodically to maintain their protective qualities.

Avoiding Harmful Finishes: Prioritizing Health and Environment

It's crucial to avoid using finishes containing volatile organic compounds (VOCs), such as polyurethane or lacquer. These chemicals can release harmful fumes into the air, posing health risks and contributing to air pollution. Choose finishes explicitly labelled as low-VOC or non-toxic to ensure a healthy and sustainable outcome.

Beyond the Bread Box: Extending Eco-Conscious Practices

Creating a DIY wooden bread box is not just about building a functional kitchen item; it's about embracing a broader commitment to sustainable living. This project can inspire further eco-conscious choices in home décor and everyday life. Consider exploring other DIY projects using reclaimed materials and prioritizing sustainable practices in all aspects of your lifestyle.

By adopting this mindful approach, we contribute to a healthier planet and a more sustainable future, one eco-friendly bread box at a time.

[Continue reading...]

DIY Wooden Bread Box Ideas for Modern Farmhouse Kitchens

- 0 comments

DIY Wooden Bread Box Ideas for Modern Farmhouse Kitchens

The modern farmhouse aesthetic, with its blend of rustic charm and contemporary clean lines, has captured the hearts of many homeowners. A key element in achieving this coveted style lies in the carefully chosen details, and a handcrafted wooden bread box stands out as a functional and visually appealing addition to any modern farmhouse kitchen. This article explores diverse DIY wooden bread box designs, providing detailed instructions and considerations for crafting your own unique piece.

Choosing Your Design: Style and Functionality

Before embarking on the construction, careful consideration of the desired style and functionality is crucial. The modern farmhouse aesthetic embraces a range of interpretations, from minimalist and sleek to more rustic and elaborate. Your bread box should complement the overall kitchen design while efficiently serving its purpose â€" keeping bread fresh.

Classic Farmhouse Style

A classic farmhouse bread box often features a simple, rectangular design with clean lines and minimal ornamentation. The wood itself is the star, showcasing natural grain and possibly featuring a distressed finish to enhance its rustic appeal. These boxes typically utilize a hinged lid, offering easy access to the bread. Consider using reclaimed wood for an authentic touch.

Modern Minimalist Interpretation

For a more contemporary take on the farmhouse style, opt for a minimalist design. Clean lines, a sleek profile, and a simple, solid wood construction are key. Avoid excessive ornamentation, opting instead for a smooth finish and potentially subtle metal hardware. A sliding top or a door with a recessed handle can contribute to the minimalist aesthetic.

Rustic Chic with Added Details

To incorporate a more pronounced rustic element, consider adding decorative details. These can include carved accents, metal hardware with a vintage feel, or a painted design inspired by traditional farmhouse motifs. Using wood with a more pronounced grain pattern, such as knotty pine or reclaimed barn wood, will amplify the rustic charm. Consider adding a small, decorative shelf on the inside for storing small items such as tea bags or butter.

Materials and Tools: Gathering Your Resources

The success of any DIY project hinges on selecting appropriate materials and tools. For a wooden bread box, the choice of wood significantly impacts both aesthetics and durability.

Wood Selection

Several wood types are suitable for crafting a bread box, each offering unique properties:

  • Pine: An affordable and readily available option, pine is relatively soft and easy to work with, making it ideal for beginners. However, it's less durable than hardwoods.
  • Oak: A classic hardwood choice, oak is strong, durable, and boasts a beautiful grain. Its denser nature makes it more resistant to wear and tear, ensuring longevity for your bread box.
  • Cedar: Naturally fragrant and insect-repellent, cedar is an excellent choice for preserving the freshness of bread. However, it can be more expensive than pine or oak.
  • Reclaimed Wood: Adding character and sustainability, reclaimed wood offers a unique aesthetic. The variety of wood types and existing patina contribute to a one-of-a-kind bread box. Thorough cleaning and preparation are essential.

Essential Tools

To ensure a successful construction process, gather the following tools:

  • Measuring Tape and Pencil: Accurate measurements are fundamental.
  • Saw (Hand Saw or Circular Saw): For cutting the wood to size.
  • Drill and Drill Bits: For creating pilot holes and attaching hardware.
  • Screws or Nails and Hammer (if using nails): For assembling the box.
  • Wood Glue: For added strength and stability.
  • Sandpaper (Various grits): For smoothing the surfaces and edges.
  • Clamps: To hold pieces together while the glue dries.
  • Wood Finish (Stain, Paint, or Varnish): To protect the wood and enhance its appearance.
  • Safety Glasses and Dust Mask: Essential for protecting your eyes and respiratory system.

Construction Techniques: Building Your Bread Box

The specific construction method depends on your chosen design. However, several common techniques are applicable across various styles.

Basic Box Construction

Most bread boxes employ a basic box structure: four sides, a bottom, and a top (either hinged or sliding). Precise cutting and accurate assembly are vital to achieve a well-fitting and sturdy box. Start by cutting the wood pieces to the desired dimensions, ensuring all angles are square and cuts are clean. Apply wood glue to the joints and secure them using screws or nails, pre-drilling pilot holes to prevent splitting. Allow the glue to dry completely before proceeding.

Hinged Lid Attachment

For a hinged lid, choose sturdy hinges that complement the style of your bread box. Attach the hinges to the lid and the top of the box, ensuring proper alignment. Consider using screws of appropriate length to penetrate the wood sufficiently.

Sliding Top Mechanism

A sliding top requires a more complex mechanism. This could involve using wooden runners or metal tracks to allow the top to slide smoothly. Precise measurements and careful fitting are crucial for a seamless operation.

Finishing Touches

Once the box is assembled, sand all surfaces thoroughly to eliminate any rough edges or splinters. Apply your chosen finish â€" stain, paint, or varnish â€" according to the manufacturer's instructions. Multiple coats may be necessary for optimal protection and a consistent finish. Allow ample drying time between coats. Finally, add any decorative details or hardware as desired.

Customization and Personalization

The beauty of a DIY project lies in its potential for personalization. Explore various customization options to create a bread box that truly reflects your style and taste. Consider incorporating:

  • Unique Wood Finishes: Experiment with different stains, paints, or varnishes to achieve the desired look, from a rustic, weathered effect to a smooth, modern finish.
  • Decorative Hardware: Select knobs, handles, or hinges that complement the overall design. Vintage-style hardware adds a touch of charm, while modern minimalist hardware keeps the design clean.
  • Engraved or Painted Designs: Add personalized touches by engraving your initials, a date, or a favorite quote. Simple painted designs can also enhance the visual appeal.
  • Inlay Work: For advanced DIYers, consider incorporating inlay work using contrasting wood species to create decorative patterns.

Creating a DIY wooden bread box is a rewarding experience that allows you to tailor a functional and beautiful piece to your modern farmhouse kitchen. By following these guidelines and exercising creativity, you can craft a unique and lasting addition to your home.

[Continue reading...]

Wooden Box DIY Ideas for Rustic Home Accents

- 0 comments

Unleash Your Inner Craftsperson: Rustic Wooden Box DIY Projects

Transform ordinary wooden boxes into extraordinary rustic home accents with these inspiring DIY projects. Whether you're a seasoned crafter or a curious beginner, these ideas offer a blend of simplicity and creativity, allowing you to personalize your space with charming, handcrafted touches. Forget mass-produced décor â€" let's bring the warmth and character of handmade artistry into your home!

Repurposed Storage Solutions

Start by sourcing your wooden boxes. Antique stores, flea markets, and even your own garage are treasure troves of potential. Look for boxes with interesting wood grain, unique hardware, or even charming imperfections. These characteristics add to the rustic charm! Once you have your box, consider its size and shape â€" this will guide your design choices. A small, square box might become a perfect organizer for jewelry, while a larger, rectangular box could house blankets or even become a unique plant stand.

Jewelry Organizer Delight

Line the inside of your box with soft velvet or felt for a luxurious touch. Divide the interior using small wooden dividers or even repurposed cardboard cut to size. Add tiny hooks or small compartments to hold earrings and necklaces. Finish with a delicate latch or a simple ribbon closure. This project transforms a simple box into a stylish and functional jewelry organizer that complements any rustic-themed bedroom or vanity.

Rustic Bathroom Caddy

For a bathroom upgrade, consider a larger wooden box. Sand it smooth, and then apply a weather-resistant sealant to protect it from moisture. Line the interior with waterproof liner and add small compartments or shelves to hold cotton balls, Q-tips, and other bathroom essentials. You can even add a small mirror to the lid for extra convenience. This creates a beautiful and functional alternative to standard plastic organizers, adding a touch of rustic elegance to your bathroom.

Decorative Wooden Box Transformations

Beyond storage, wooden boxes offer a fantastic canvas for decorative projects. Experiment with various painting and staining techniques to enhance the natural beauty of the wood or create a completely new aesthetic. Don't be afraid to embrace imperfections â€" they add to the rustic charm!

Painted Floral Paradise

Embrace your artistic side by painting delicate floral designs onto your wooden box. Choose colors that complement your existing décor. Consider using stencils for a clean, precise look or freehand painting for a more whimsical, rustic feel. Once the paint is dry, add a coat of varnish or sealant to protect your artwork and add a subtle sheen. This project adds a vibrant touch of color and personality to any space.

Distressed Wood Masterpiece

For a truly rustic look, distress your wooden box by using sandpaper to create a weathered effect. Focus on edges and corners for a more authentic appearance. You can also use a dark wax or stain to highlight the wood grain and further enhance the distressed look. This creates a box that tells a story â€" a perfect accent piece for a farmhouse-style home.

Beyond the Basics: Creative Wooden Box Ideas

Let your imagination run wild! Explore unconventional uses for your wooden boxes.

  • Floating Shelves: Attach small boxes to the wall to create unique floating shelves for books, plants, or decorative items.
  • Plant Holders: Drill drainage holes into the bottom and create miniature planters for succulents or herbs.
  • Picture Frames: Cut a section out of the lid and insert a favorite photo for a rustic picture frame.
  • Gift Boxes: Decorate your boxes and fill them with personalized gifts for unforgettable presents.

The possibilities are truly endless! With a little creativity and some simple tools, you can transform ordinary wooden boxes into stunning, personalized rustic home accents that reflect your unique style and add a touch of handcrafted charm to your living spaces.

[Continue reading...]

DIY Wooden Bread Box Ideas for Organizing Baked Goods

- 0 comments

DIY Wooden Bread Box Ideas for Organizing Your Baked Goods

Hey there, fellow bread lovers! Let's talk about something near and dear to my heart (and stomach): keeping our freshly baked goods as delicious as possible for as long as possible. And what better way to do that than with a beautiful, handcrafted wooden bread box? Forget those flimsy plastic containers â€" we're diving into the world of DIY! This isn't some intimidating woodworking project; we'll cover options for all skill levels, from super simple to more ambitious builds. Let's get started!

Why a Wooden Bread Box?

Before we jump into the how-to, let's chat about the *why*. Why bother making a wooden bread box when you can just grab one from the store? Well, a few reasons actually:

  • Personalization: A store-bought bread box is… well, store-bought. A DIY bread box is uniquely yours! You can choose the wood type, the stain, the size â€" everything! You can even add little personal touches like carvings or painted designs.
  • Quality and Durability: Wooden bread boxes are built to last. A well-made one will be a beautiful addition to your kitchen for years to come, unlike some cheaper plastic options that crack or break easily.
  • Cost-Effectiveness: While the initial cost of materials might seem comparable, or even slightly higher, to a cheap plastic box, a high-quality wooden bread box is a much better long-term investment. You will save money in the long run by not constantly needing replacements.
  • The Satisfaction Factor: There’s an immense sense of accomplishment that comes with creating something with your own hands. Plus, imagine the pride you’ll feel showing off your handiwork to your friends and family!

Easy DIY Bread Box Ideas for Beginners

Don't worry if you're not a seasoned woodworker. There are plenty of simple designs perfect for beginners. These often utilize readily available materials and straightforward construction techniques.

Repurposed Crate Bread Box

This is probably the easiest option! Find a sturdy wooden crate at a flea market, thrift store, or even a farm supply store. Give it a good clean, sand down any rough edges, and then personalize it! You could stain it, paint it, add handles, or even line the inside with fabric for a softer touch. It’s rustic, charming, and requires minimal tools!

Simple Wooden Box with Hinges

You can buy pre-cut wooden pieces designed for creating boxes. These usually come with instructions, making assembly a breeze. All you need to do is assemble the box according to the instructions, attach some hinges, and add a latch or clasp. You can find these kits online or at craft stores.

Pallet Wood Bread Box

If you're environmentally conscious and have access to reclaimed pallet wood, you can build a fantastic bread box using this sustainable material. Just make sure the wood is clean, treated properly (if necessary), and sanded smooth. This project requires slightly more carpentry skills than the crate option, but the rustic charm is unbeatable!

Intermediate DIY Bread Box Projects

Feeling a little more confident with your woodworking skills? Let’s step it up a notch!

Custom-Sized Bread Box

Instead of using pre-cut pieces, you can design your own bread box from scratch! This allows for complete customization in terms of size, shape, and features. You'll need to use a saw, a drill, and some woodworking glue. Measure carefully and follow your plans diligently. The end result will be a bread box perfectly tailored to your needs.

Bread Box with Sliding Lid

A sliding lid is a bit more challenging to construct, but it provides a sleek and modern look. This design requires precise measurements and cuts for the smooth operation of the sliding mechanism. You may need to use wooden runners or metal tracks for a smooth and easy slide.

Bread Box with Built-in Cutting Board

Combine functionality and style with a bread box that doubles as a cutting board! You'll need to incorporate a removable or hinged cutting board into the design. This adds an extra layer of complexity, but the result is a truly unique and practical kitchen item.

Advanced DIY Bread Box Challenges (For the Experienced Woodworker)

Ready for something really impressive? These projects require more advanced woodworking skills and tools, but the payoff is a truly stunning and unique bread box.

Intricate Carvings and Inlays

For those with carving skills, you can elevate your bread box design with intricate carvings or inlaid designs. This requires specialized tools and a good eye for detail, but the result will be a breathtaking piece of functional art.

Shaped Bread Box

Instead of a simple rectangular box, you could craft a more unique shape â€" perhaps a curved design or a more rustic, farmhouse-style bread box. This takes advanced joinery techniques and precise measurements.

Essential Tools and Materials

The specific tools and materials you'll need will vary depending on the complexity of your chosen project. However, some common items you'll likely need include:

  • Wood (various types depending on your preference and the project’s complexity)
  • Wood glue
  • Saw (hand saw, circular saw, jigsaw)
  • Drill and drill bits
  • Screws or nails
  • Sandpaper (various grits)
  • Wood stain or paint (optional)
  • Hinges
  • Latches or clasps
  • Measuring tape
  • Pencil

Frequently Asked Questions

Here are some commonly asked questions about DIY wooden bread boxes:

Q: What type of wood is best for a bread box?

A: Many types of wood work well! Cedar is naturally insect-repellent, making it a good choice. Pine is readily available and affordable. Hardwoods like oak or maple are durable but more expensive.

Q: How do I seal the wood to protect it?

A: Apply a food-safe wood finish, such as mineral oil or beeswax, to protect the wood from moisture and bacteria. Avoid using varnish or polyurethane, as these can contain chemicals that aren't suitable for food contact.

Q: How do I prevent mold and mildew?

A: Properly sealing the wood, ensuring good ventilation inside the bread box, and keeping the bread box clean are key to preventing mold and mildew growth.

Q: What if I don't have woodworking experience?

A: Start with a simple project like repurposing a crate or using a pre-cut kit. There are tons of tutorials and videos online to guide you through the process!

So there you have it! Whether you're a seasoned woodworker or just starting out, crafting your own bread box is a rewarding project. Get creative, have fun, and enjoy the delicious smell of fresh bread kept perfectly in your handcrafted masterpiece!

[Continue reading...]
 
Copyright © 2012. the woodwork - Posts · Comments
Powered by Blogger